.jpg)


Custom Lead Qualification in Dynamics 365
- Angeliki Patsiavou
- Mar 1
- 3 min read
So, I just sold you. And this is crazy. But here’s my order. So qualify me maybe?
Dynamics 365 Sales has a lot of cool CRM features and integrations built natively. One of the more famous and relatable areas are Leads and qualifying them into Accounts.
Whilst there is an out-of-the-box process for Leads getting qualified into Accounts through the Qualify button, and system settings for it, what happens if you truly want to customize it?

Clarifying a few things first
Expectedly so, you must be a system admin to customize lead qualification. It is helpful to bear in mind that, as an admin, you will find that the new experience is on by default.
If you’re wondering what that includes compared to the previous legacy version:
Choose whether the sellers or the system should create opportunities when qualifying a lead
Allow multiple opportunities (up to 5) to be created from a single lead record
Customize the opportunity form which appears after qualification
Enable Copilot to summarize the lead after qualification (part of the wider app settings)
Comparatively, the legacy version only permitted the automatic creation of account, contact, and opportunity records.
Where to start with the customisation – User - system interaction
It all starts in the Sales Hub, no surprises there. You need to toggle from the bottom left of the site map navigation from Sales into App Settings.

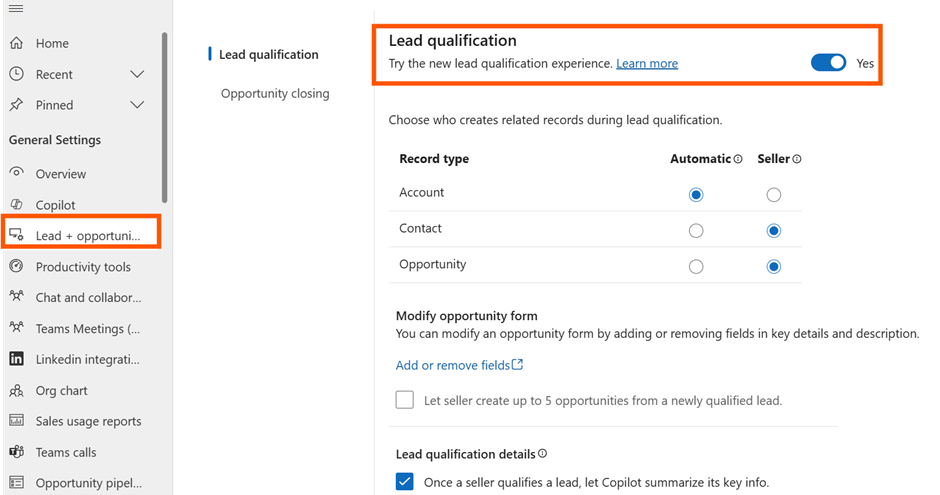
As you have navigated into the App Settings, go into Lead + opportunity management. By default, you get the new lead qualification experience enabled and thus switched to Yes. Within it, you can choose whether the process should automatically create upon lead qualification an account, contact or opportunity. Otherwise, it can remain a manual choice for the seller.
There are other options such as to enable the creation of multiple opportunities (up to 5) from a single lead.
Whatever you choose is the impact in the front-end experience upon clicking the Qualify button.

Customizing the lead to account mappings, maybe
As usual, customizing the out-of-the-box lead qualification experience means 2 benefits:
No effort from the user to transfer the data from the lead into the new account record
An active choice of which fields map where, both out of the box and custom
So, how do we do it? Now let me just say, at this point, that I could not find for the life of me where that was when I first tried to do it. MS Learn article after article would not show where the mappings actually are/ change. And whilst I like a good mystery, this was worth the discovery!
I hope you are a fan of the old UI, because we’ll go soon down memory lane!
From the Dynamics 365 Sales app, go into Settings and select Advanced Settings.

From the left-hand side navigation, select Customizations.

Select Customize the system.

I threw a wish in the well, and the old, classic UI came up – Collapse Entities on the left.

Now, collapse the Lead entity and select the 1:N relationships.

Then select account_originating_lead, which will open up a new window. This is so you can map what columns, out-of-the-box or custom, from the lead should map to the new account record post qualification.

Go to Mappings.

Here you will find by default the out-of-the-box column mappings (full list explained here). The source is the Lead table and the target is the Account table.

If you want however to map your new custom columns OR an out-of-the-box one that has not been mapped yet, then click on New.

A new window will appear. Find the Lead table column you have created (or an out-of-the-box one that has not been mapped yet) on the left, then choose your target on your right. When ready, click OK. You should then see it in the full list.

Where you think you’re goin’ - Bonus tips
System recommendations: If you want the system suggest and create some mappings, you can also click on More Actions and then Generate Mappings. Of course, it is recommended you review after!

Mapping from Leads to Contacts: In a similar fashion, if you want to customize the mappings from a Lead getting qualified into a Contact, then you must select the schema name for contact_originating_lead. Once again, some out-of-the-box mappings there – add more as needed.

Mapping from Leads to Opportunities: No surprise by now, if you want to customize the mappings from a Lead getting qualified into an Opportunity, then you must select the schema name for opportunity_originating_lead. Once again, some out-of-the-box mappings there – add more as needed.

Ready to start qualifying, maybe?!

Thank you, good timing for me and saved our team some cross team communication